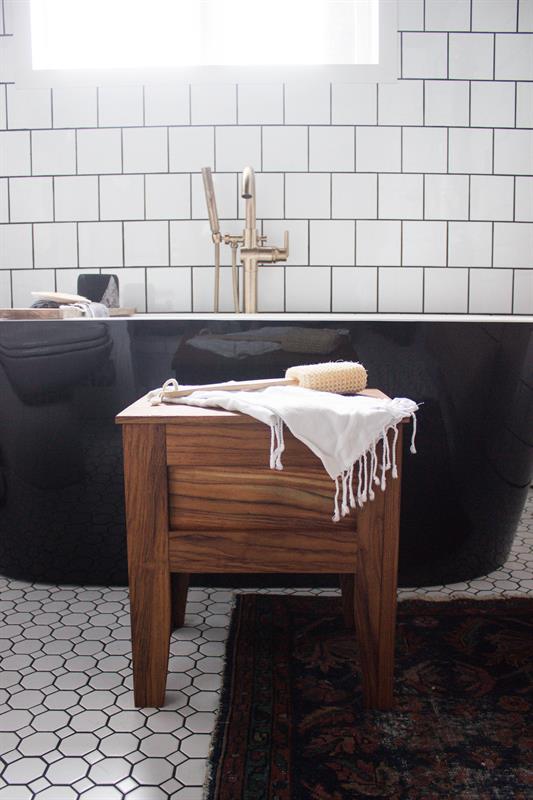
A beautiful bathroom bench with hidden storage for bathtub toys. Storage is key for every bathroom, especially for those wet kid’s toys. This very beautiful and functional bathroom bench has hidden storage for all those items lying around the bathroom.

Cutting List
- (4) “A” Side Rail, 7/8″ thick X 2 1/2″ wide X 7″ long
- (4) “B” Front Side Rail, 7/8″ thick X 2 1/2″ wide X 11″ long
- (6) “C” Bottom Slat, 7/8″ thick X 5/8″ wide X 14 1/2″ long
- (2) “D” Front Panel, 3/8″ thick X 11 7/8″ long X 5 1/8″ tall
- (2) “E” Side Panel, 3/8″ thick X 8 1/8″ long X 5 1/8″ tall
- (4) “F” Leg (large), 7/8″ thick x 18″ long x 2 1/2″ wide
- (4) “G” Leg (small), 7/8″ thick x 18″ long x 1 5/8″ wide
- (4) H” Top Board, 7/8″ thick x 17″ long x 3″ wide
How to Make it
Step 1
Layout and Cut Components

Following the attached plans. Mark out your cuts on your piece of lumber, we used 1″ x 8″ teak x 14′ long. Cut out all the parts as per the material list in the plans. Once cut lightly sand all the pieces down. *Part “C” slightly larger (approx 1/4″) as you want to ensure a tight fit when installing them later on – actual size should be closer to 14 1/4″. *The top boards’ lengths on the material list are about 1/2″ longer so that you can square up the ends once the glue sets. The final length should be 16 1/2″
Step 2
Groove pieces A and B

Next is to prep the pieces that hold the inset side panels. I used my Kreg router table to cut the 1/2″ by 1/2″ groove into all the pieces as per the drawings.
Step 3

Groove E and F – Step 1
Next is to cut a groove in the areas on the leg that hold the inset side panels. I used my Kreg router table and cut the 1/2″ by 1/2″ groove into all the pieces as per the drawings. If you have a fence with stops on your router table you can use them to set the distance you need to cut to ensure all the grooves are the same. *Note this groove is NOT along the entire edge so you will need to be careful where it starts and stops.
Step 4
Grove E and F – Step 2

Due to the plunge cut on pieces E and F I used a chisel to clean out the corners and remove the radius from the router.
Step 5
Cut Bevel on Legs

Take your 8 pieces for the legs (parts “E” and “F”) and cut the bevel detail on the bottom of the leg as per the drawings. I used a table saw to complete these cuts.
Step 6
Glue legs together

Now that your legs have the angle on the bottom cut out and the groove cut, do another light sand. Glue and clamp the “E” and “F” pieces together and take note of the orientation of all 4 legs on page 1 of the drawings. Be sure to use wood glue that is good in a water environment as the stool may get wet. This is also the reason Teak is being used for this project as it is naturally water-resistant and very durable in wet conditions.
Step 7
Drill Pocket Holes

Take the “A” and “B” rail pieces and drill the pocket holes on the ends as noted in the drawings.
Step 8
Assembly of Stool frame

Once your legs have had time to let the glue set (follow the manufacturer’s recommendation on the glue you are using) give the legs a light sand again and be sure to remove excess glue. Place the “A”, “B”, “E”, and “F” pieces as per the layout shown in the drawings. I also glued the ends of the “A” and “B” boards before screwing. Clamp the pieces down to your table or workbench and screw the pieces together. I used 1-1/2″ pocket screws as the material I was using was 1″ (7/8″ actual) thick. Your K4 jig has a chart for settings for the K4 jig, drill bit, and screw size for the thickness of the material you are using.
Step 9
Cutting of Panels D and E (no image)
Now that your frame is assembled you can cut the panels in between the rails and legs. To do this I cut the panels down to the dimensions noted in the drawings. I then cut the 1″ thick material in half using the table saw (all four sides) and saw-z all to finish the cut (your table saw blade may not cut all the way through, using a saw-z with all long blade you can cut the material in the middle that your table saw blade couldn’t reach. Once the cut is complete, sand all sides to a smooth finish.
Step 10
Install Panels D and E

Now that the pieces are cut and sanded you can glue and place the panels in between the legs and rails. I flipped my clamps so that they could “push out” and clamp the panels into place from the inside of the box.
Step 11
Prep Bottom Slats for Installation (no image)
In step 1 part “C” was cut to size. Take the 6 slats and run them through your router table. Using a 1/8″ dia router bit, cut the radius on the long edges of all 4 sides of the slats. This could also be done with a sander; however, you will have more control with the router.
Step 12

Install slats
I measured and cut each slat to length to ensure it had a nice tight fit. Glue and clamp your slats into place, I made a 7/8″ thick block out of scrap wood to space the slats along the bottom. I had to adjust the spacing slightly (as the actual gap is a nice nominal fraction) so the gaps varied from 7/8″ to 1″ thick.
Step 13
Glue top

We cut 4 pieces of teak down to 3 1/8″ wide x 17″ long. I then glued all the edges, clamped vertically and horizontally and let the glue set. These boards will make the top of the stool.
Step 14
Finish Top

Once the glue has set, sand down all the faces of the board to remove any edges/ridges and excess glue. Your end product should look like a single board. Take the measuring tape and square and mark out the perimeter groove to be cut and removed. The groove will hold the lid in place once cut.
Step 15
Cut Groove in Top

Take the board and place your blade on your table to the correct groove depth and complete your first cut on all four corners (board sitting vertically up). Once all 4 sides have been cut, place the board flat on the table saw and set the table saw fence and depth of cut as per the details on the drawings. Cut all 4 sides. This should result in the middle portion of the board being the original thickness and the outside edge being approximately 1/2 the original thickness.
Step 16
Finish Top (no image)
Do a test fit. The top should sit on the stool with the grooved area sitting tightly against the outer rails and tops of the legs. If the underside doesn’t sit snugly against the frame, you may need to make some minor adjustments. Test the lid and remove small amounts of material at a time until the lids fits tightly within the rails.
Step 17
Prep for Finish (no image)
Take a look at the stool before applying your finish. Remove any glue and sand any imperfections. Clean stool of any dust.
Step 18
Apply Finish
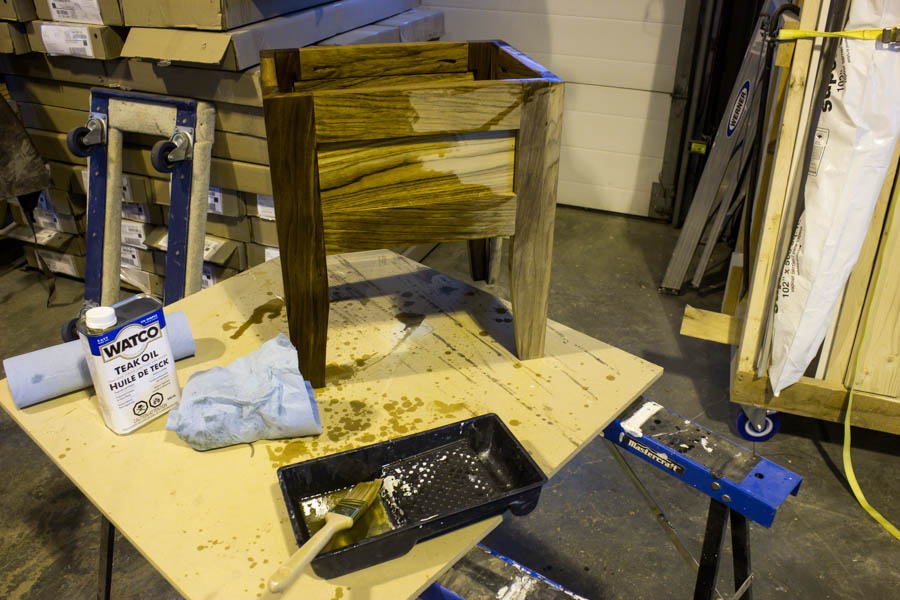
Follow the Finish’s Manufactures Directions for application. In my case, I applied the Teak Oil using a brush and let the finish sit on the stool for 15-20 mins. I then used a cloth to remove any excess oil. Let your stool dry for the recommended period before using it. Your bench is now complete!
By Buildsomething.com