Bathroom Storage Shelves DIY
Add elegant storage to any bathroom with this simple, compact, but functional over-the-toilet ladder shelf. It’s a great place to store bathroom necessities in a room that’s always storage-challenged. Plus, it’s a perfect place to show off those beautiful guest towels nobody is ever allowed to use. Follow these steps to make bathroom storage shelves.

Materials Required:
Wood Products:
(2) 1×2, 96”, Board
(2) 1×2, 72”, Board
(1) 1×10, 96”, Board
Hardware/Supplies:
(1) 100-count box 1 ¼” course-thread Kreg pocket-hole screws
(1) wood glue
(1) pack non-skid pads
(2) 2” wood screws
(2) medium-duty wall anchors
Step 1
Cut Long and Short Legs
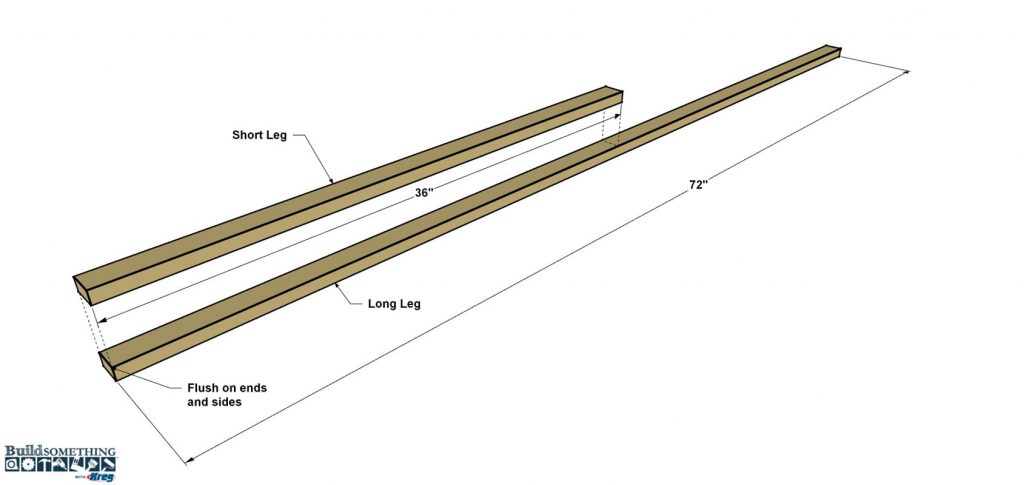
Cut two long legs to length from 1×2 x 96″ pine boards, as shown in the cutting diagram. Now, cut two short legs to length from two 1×2 x 72″ boards.

Step 2
Assemble the Legs
Apply glue to one face of a short leg and apply it to the lower portion of a long leg. Make sure the legs align on the edges and at the lower ends. Then clamp the pieces until the glue dries. You don’t need to wait until the glue is completely set, which can take several hours. After 15 minutes, or so, the glue’s hold should be strong enough to remove the clamps, as long as you handle the piece gently. Repeat this process to glue up the second short leg and long leg.
Step 3
Cut the Shelf Spacers (no image)
Using the leftover portions of the 72″ boards, as shown in the cutting diagram, cut six shelf fillers and two top fillers to length, as shown in the cutting diagram.
Step 4
Attach the Fillers
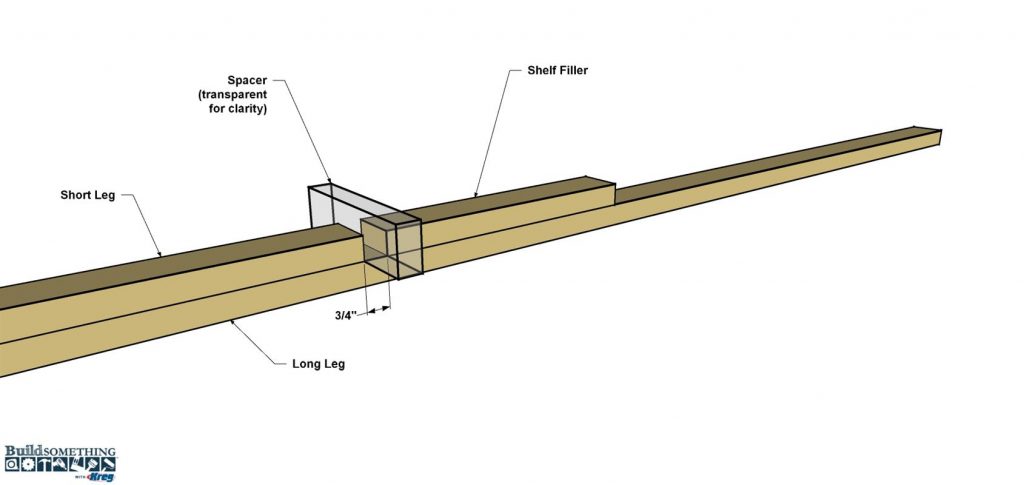
Now you can attach the shelf fillers to the long legs, as shown. Use a scrap piece of a board to act as a spacer as you position the shelf fillers on the long legs. Start against the upper end of the short leg, apply glue to one face of a shelf filler, and position it on top of the spacer. Align the edges of the shelf filler with the spacer and the long leg, and then clamp the shelf filler in place. Remove the spacer—make sure to take it out before the glue dries so you don’t accidentally glue the spacer in—and repeat the process for the next two shelf fillers. Then add the top filler and do the same on the other leg assembly. After the glue dries, scrape off any excess, and then sand the leg assemblies smooth.
Step 5
Make the Braces
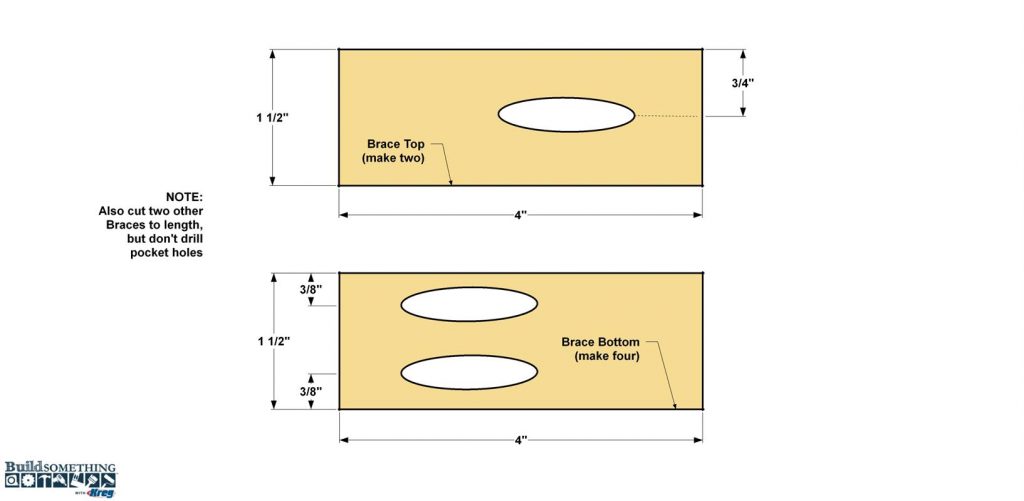
Using the leftover portions of the 96″ boards, cut eight braces to length, as shown in the cutting diagram. All eight braces are the same length, but they get completed differently. You’ll see why in Step 6. For now, put two of the braces aside. You’ll drill pocket holes in the remaining six—but not in the same locations. First, set up your Kreg Pocket-Hole Jig for 3/4″- thick material. Then drill two pocket holes at one end of four of the remaining Braces, as shown to create four brace bottoms. On the final two, drill a single pocket hole in each to create two Brace Tops, as shown.
Step 6
Assemble the Braces
Now you can assemble the braces. Like the legs, they’ll get glued face-to-face to double the thickness. Make sure to pair them up, as shown. The two brace tops get paired with two of the brace bottoms, making sure the pocket holes are at opposite ends. The blank braces get paired to the remaining two brace bottoms. Once you have them paired up properly, apply glue to one face of each matching pair, and then clamp each pair together. Make sure the edges and ends are aligned. After the glue dries, scrape off any excess, and then sand all the brace assemblies smooth.

Step 7
Add the Braces to the Legs
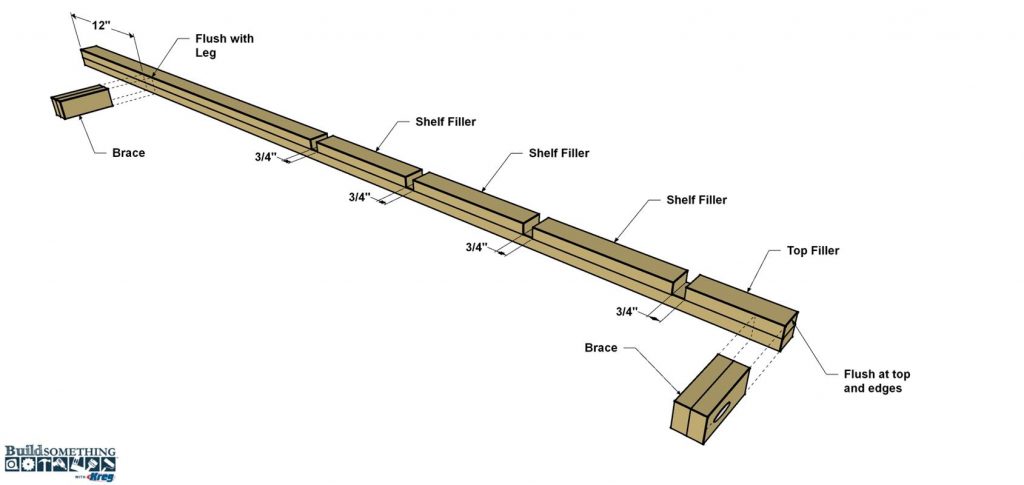
Position the brace assemblies as shown on one of the leg assemblies. Note that the blank braces face upward, and are placed near the lower end of the leg. The brace assembly with a single hole goes flush with the upper end of the leg. That way, you can use the pocket hole to drive a screw into the wall, as discussed in Step 11. Use glue and 1 1/4″ coarse-thread Kreg Screws to attach to these brace assemblies. Repeat this process with the other two brace assemblies and leg.
Step 8
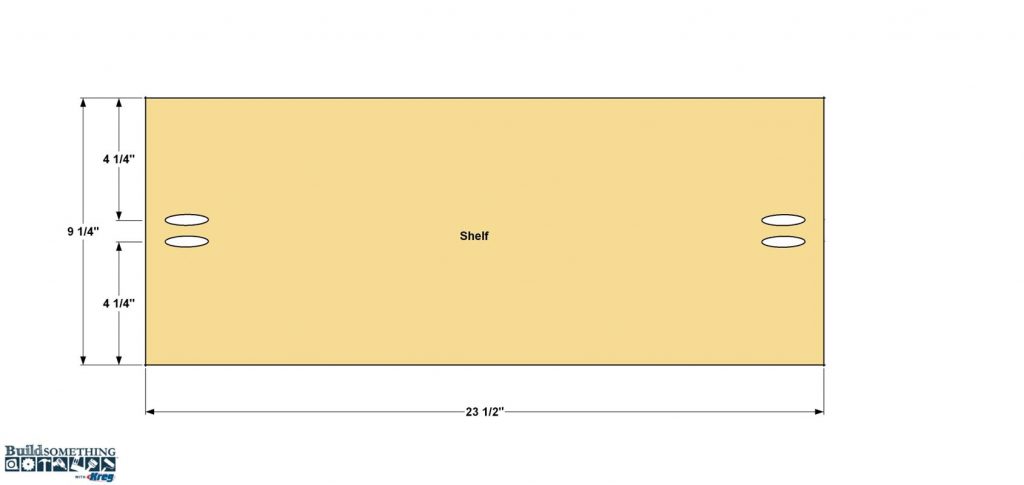
Make the Shelves
From a 1×10 board, cut four shelves to length, as shown in the cut diagram. Drill two pocket holes centered on the ends of each shelf, as shown. Sand the shelves smooth, including the edges and ends.
Step 9
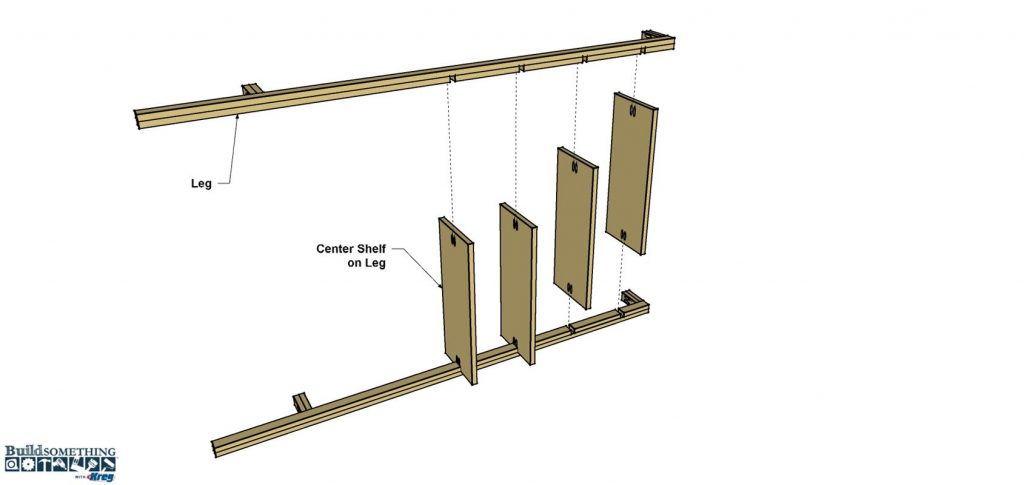
Attach the Shelves
Position one leg assembly on its side on a work surface. Place the first shelf in the “notch” created by the space between the short leg and the first shelf filler, as shown. Make sure the shelf is centered on the leg, and then secure it using two 1 1/4″ coarse-thread Kreg Pocket-Hole Screws. Repeat this for the other three shelves. With one side complete, flip the assembly over onto the second leg and secure the shelves to the other leg assembly in the same way.
Step 10
Sand and Apply Finish (no image)
After assembly, you can do any touch-up sanding that’s needed, and then apply the paint or finish of your choice. We used natural oil to give the project colour. After allowing the oil to dry according to the directions, we applied two coats of wipe-on polyurethane for protection.
Step 11
Mount the Shelves to the Wall (no image)
Apply non-skid pads to the bottom of each leg and position your shelf unit so it’s centred over the toilet. Make sure the shelf is plumbed to the wall. Once you have the shelf where you want it, drive 2″ wood screws through single holes at the top, and into the wall. You may hit a stud, but chances are the screws will just push into the open space in between studs. If so, back the screws out and move the shelf unit out of the way. Install two wall anchors by first enlarging the holes the screws made in the drywall, and then tapping the anchors in. Now you can stand the shelf unit in place for a final time, and then drive the 2” screws into the wall anchors.
Show off your new bathroom storage shelves.